
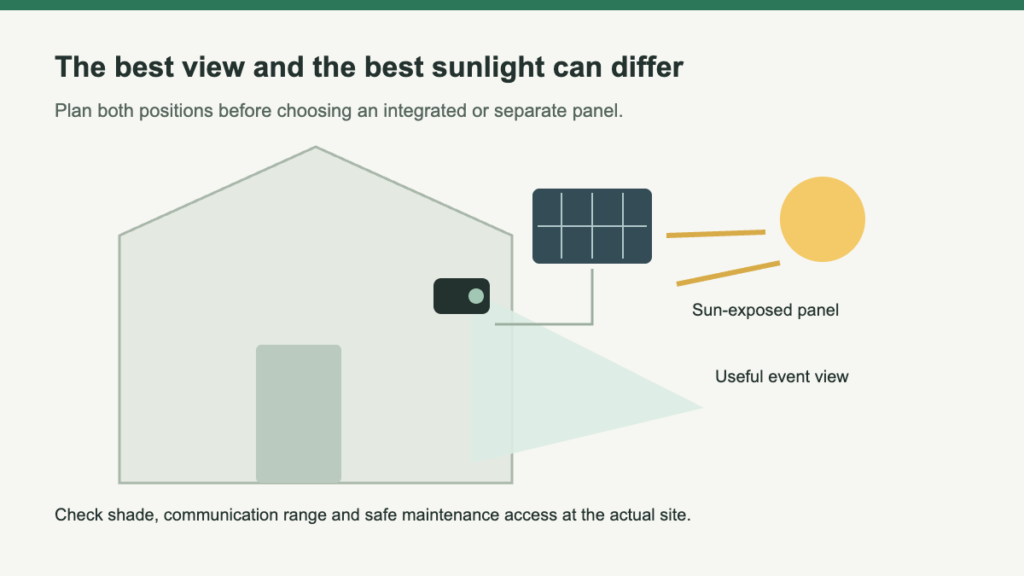
Choose a camera position for the scene it must record and a solar-panel position for the light it can receive. With separate components, those decisions can be made independently within the supported cable and mounting arrangement. With an integrated panel, the same location must satisfy both requirements.
The best-looking mounting spot is not necessarily the most useful one. A neat position under a deep overhang may shelter the equipment but shade its panel. A sunny position may show an unhelpful angle of the entrance. Work through the view and the charging conditions before making permanent holes.
Mark the event location, not just the camera location
- Mark the event
Stand at the gate latch, delivery area or side-door approach. Decide what the saved clip must show.
- Check normal obstructions
Allow for an opening door, parked vehicle, fence post or growing plant—not just an empty scene.
- Check each intended view
A motor cannot see through obstacles or maintain simultaneous coverage in another direction.
Inspect sunlight as a changing condition
- Observe more than midday. Roof edges and branches change the shade pattern. A successful summer setup does not validate winter exposure.
- Use the exact accessory instructions. Ring’s guidance emphasizes direct sunlight, but recommendations differ by accessory. Do not import one universal daily-hours target.
- Compare input with workload. Frequent activity and viewing can increase consumption. Some daylight does not prove energy balance, and a functioning supported charger need not keep the display permanently full.
Decide whether one mounting position must do both jobs
| Design | Placement advantage | Placement constraint |
|---|---|---|
| Panel integrated into the camera | Fewer separately positioned components | The camera's required view and the panel's exposure are coupled |
| Separate panel connected to the camera | More freedom to choose sunlight independently | Supplied cable reach, connector compatibility and routing limit the options |
| Solar-supported multi-camera kit | Several priority views can be assigned | Each camera's charging and connectivity conditions need checking |
This is a comparison of installation arrangements, not a ranking of brands. A compact integrated camera can fit an exposed entrance well. A separate panel can be more useful where the camera's sensible viewpoint is shaded, provided the compatible connection arrangement reaches a better location.
Do not assume that a familiar connector establishes compatibility with a different panel or extension. Follow the model-specific accessory requirements. Avoid unsupported modifications, exposed connections or routing that creates a snagging hazard; obtain appropriate installation help where the work cannot be done safely.
Check the same scene after dark
Review moving subjects under the actual lighting. Brightness alone does not establish useful recognition detail.
Check the effect on visitors and the relevant scene. A stated night-vision distance is not a promise about faces or other small details.
Avoid unnecessary views into neighbors’ private areas. Resolve local legal or shared-property questions before mounting.
Leave room for ordinary maintenance
Repeat the check for every camera in a kit. A sunny front entrance does not validate a narrow side passage or detached garage; each has its own exposure and connection conditions.
Approve the mount before making it permanent
- Frame the event. Include the approach or stopping point that matters.
- Check the actual radio. Confirm this camera’s supported network at that position.
- Place the charging surface. Use an approved panel route and the manufacturer’s installation guidance.
- Inspect saved footage. Include ordinary daytime and nighttime use.
- Preserve access. Keep cleaning, supported charging and storage maintenance safely manageable.
For multi-camera systems, repeat the checks at each position. A sunny front entrance does not validate the shaded side passage. The final layout must balance useful evidence, communication, light and service access—not merely make the first live picture look good.
Leave a Reply